
Is your workspace helping you work and be successful, or crippling you in the process? Consider this: The average cost of a chronic low back disorder is $100k. Studies have shown that ergonomic design in your work space, whether at the office or at home, can not only reduce injury and pain, but boost your productivity and overall satisfaction as well.
The following is the ULTIMATE guide to creating the perfect ergonomic workspace, whether at home or at your office. We look at all the best practices and workstation equipment you should adopt now to save yourself from serious health issues such as carpal tunnel syndrome and repetitive strain injuries down the road. Lets get started.
Easy Steps to the Perfect Ergonomic Workspace
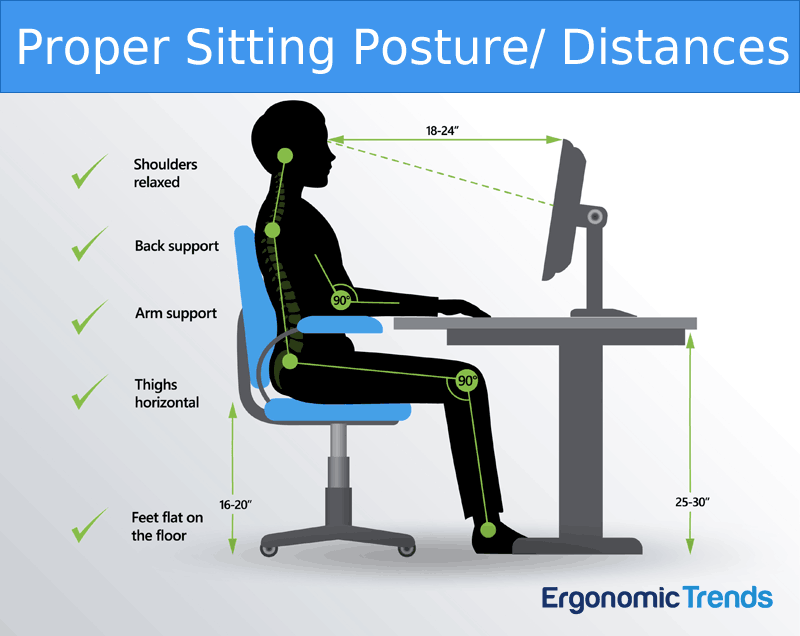
Proper Sitting Position and Distances
Step 1 – Choose the Right Chair
Finding a suitable ergonomic office chair is arguably the most important piece of the ergonomic workspace puzzle. According to research, and estimated 50% of people in the industrialized world suffer from some form of back pain, many directly related to poor seat design. Spending 8 to 15 hours daily in any chair less than ideal is just begging for all sorts of ailments such as back and neck pain down the road.
 There are countless options on the market when it comes to ergonomic chairs, many of them using the word “ergonomic” loosely or even downright dishonestly. If you’re experiencing pain and strain at work, getting a good chair is just as important – and just as difficult – as getting a good mattress.
Here are the most important factors to consider:
- Height – You should be able to sit with your feet flat on the floor and your thighs roughly parallel to the floor. If you need a taller chair in order to reach a too-tall desk, use a foot rest to get the right leg angle.
- Backrest Recline and Tilt – To reduce stress in your spine, an office chair that reclines and tilts with tension control are absolutely critical. Research has shown that a reclined seat significantly reduces the pressure on your back, and is particularity beneficial for people with back pain. Look for chairs that can recline at least 135 degrees back with synchronous tilt.
- Lumbar support – the shape of the backrest should have a natural curve to support your lower back. Think Birkenstocks for your back. Consider using a lumbar support pillow if your chair lacks proper lumbar support.
- Seat depth – For fixed seats, the ideal depth is 16.5″, and 14-18.5″ for adjustable seats (source).
- Arm rests – Look for armrests that are not just height adjustable, but can pivot inwards to support the entire length of your forearm when performing certain tasks such as keyboarding.
- Material – Try to find a comfortable amount of cushioning: your chair should feel supportive without being overly hard. Look for breathable or mesh fabric.
The more adjustability a chair offers, the more likely it will work for you. Invest in a quality ergonomic office chair that builds into it all the best practices for a comfortable ride even through prolonged use.
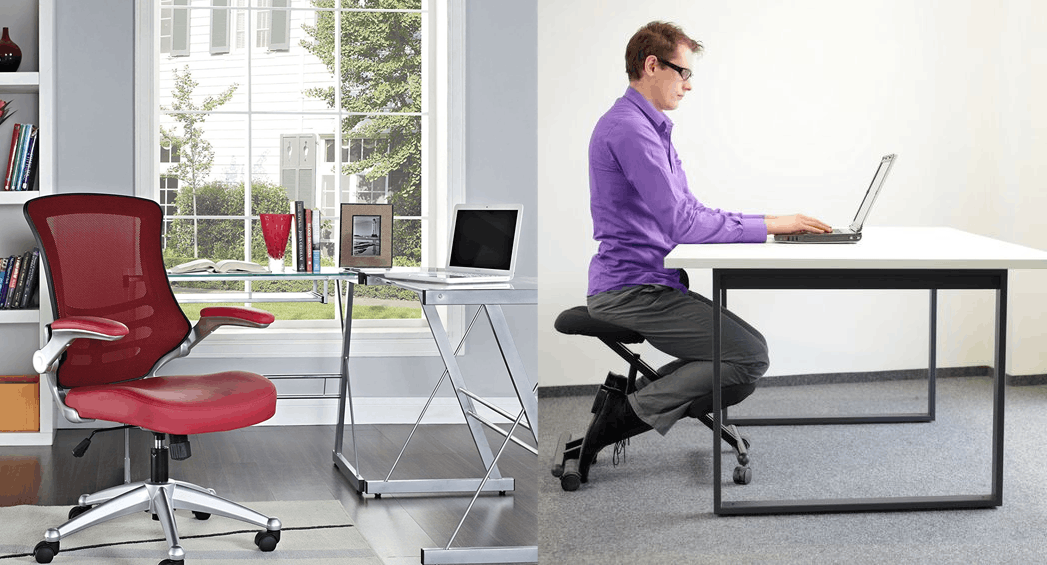
Good Ergonomics- Switch between Office Chair and Kneeling Chair Periodically (Modway Red Ergonomic Chair and Modway Sleekform Kneeing Chair)
Even with the perfect ergonomic office chair, you’ll want to modify your sitting position from time to time to allow blood flow to evenly reach all parts of your body. An ergonomic kneeling chair has become a popular compliment to an office chair to relief the tension in your lower back that arises from sitting in a traditional chair for too long. Alternating between the two types of chairs goes a long way in reducing strain, fatigue, and pain incurred over time from sitting.
Step 2 – Adjust your Desk Height
 If you have a desk job, it goes without saying that your desk is the heart of your workplace. There are a number of different desk designs out there, offering a variety of shapes, cut-out areas and different heights. From an ergonomic point of view, the most important aspect of your desk is the height.
A too-high desktop will cause strain on your forearms as you type, while an overly low desk will cause you to hunch over as you work, straining your back and shoulders.
How do you know if your desk is at the right height?
- Your legs should fit comfortably under the desk if you are sitting with your feet flat on the floor: you should have enough space to cross your legs.
- The angle between your forearm and upper arm should be between 90 degrees and 110 degrees while your arms are at rest on the desk.
- The Canadian Standards Association (CSA) recommends a general height desk of 73 cm plus or minus 2.5 cm (28.7″ plus or minus 1″).
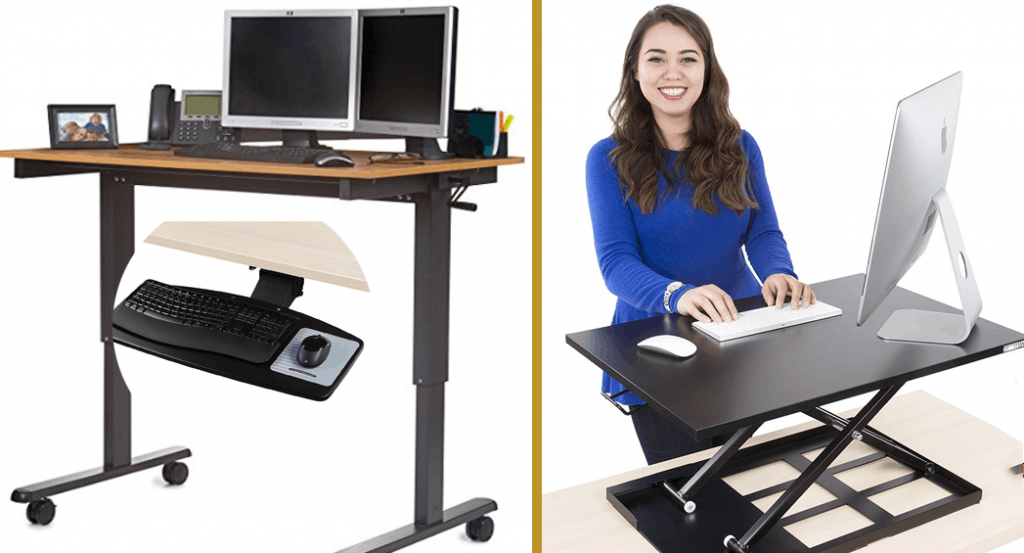
Just as important as the proper desk height is the ability to adjust it throughout the day. Altering your posture throughout the day not only fights fatigue, but helps to prevent repetitive motion related injuries. This is why sit to stand desks and adjustable height desks have become so popular as part of an ergonomic workstation.
Ergonomic Desks
Good Ergonomics- Use an Ergonomic Desk, Desk Riser, or Keyboard Tray in your Workspace
Adjustable height desks are at the forefront of ergonomic desk design, by allowing you to set your entire workstation height to precisely your comfort level, which may vary depending on your task.
Another huge benefit of adjustable height desks is that it allows you to alternate between sitting and standing. Sitting all day has been scientifically shown to increase the risk of high blood pressure, back injury and even death. Spending your entire working day standing can be exhausting and potentially just as damaging, so the ability to alternate between the two postures is ideal.
If you’re not ready to throw out your current desk for an adjustable one just yet, look into an Adjustable Desk Riser to modify your existing desk height for similar ergonomic benefits.
Step 3 – Position Your Monitor Properly
Monitor placement may not be the first thing you think of if you’re experiencing pain and fatigue at the computer. However, a badly placed monitor can cause neck and shoulder pain, headaches and other symptoms that you may blame on your chair or desk. Here are the most important considerations to remember when it comes to monitor placement:
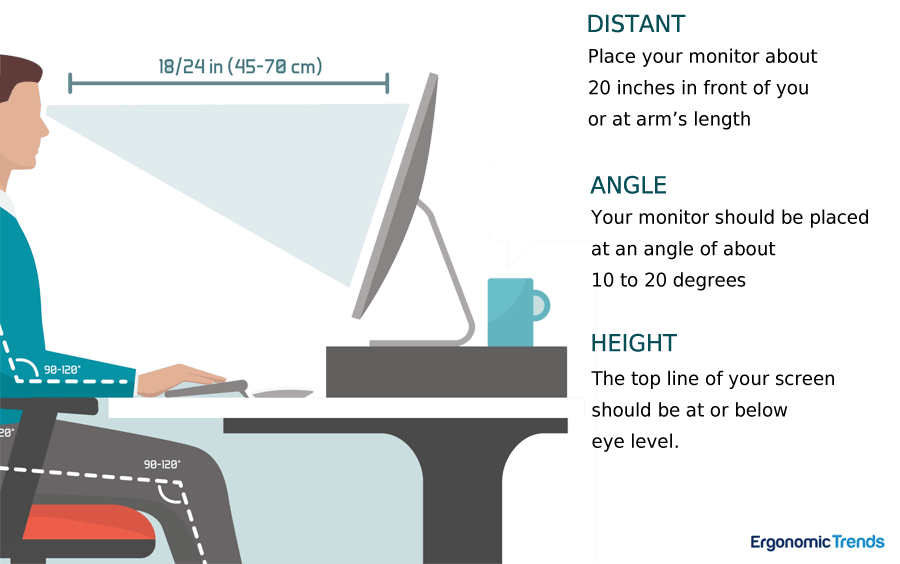
Good Ergonomics- Proper Monitor Position and Angle
Distance: Place your monitor about 20 inches in front of you, or at arm’s length. Putting it too close will strain your eyes, while placing it too far away may make you slouch forward in an attempt to read what’s on the screen.
Angle: Your monitor should be placed at an angle of about 10 to 20 degrees. A greater angle will cause you to hold your head at an uncomfortable angle, leading to neck strain.
Height: the top line of your screen should be at or below eye level. Tilting your head back to try to read your monitor can lead to headaches and neck pain.
Lighting: Good lighting ergonomics in the office involve many things, from sufficient lighting (300 – 500 lux), elimination of shadows and dark spots in the room, to removing glare and picking the right color temperature based on the type of work you do.
Monitors often come fixed to their stands, making them hard to adjust. Fortunately, there are plenty of adjustable monitor stands available, and it’s relatively easy to improvise something as well. You can try stacking books or reams of printer paper to see what works for you. Once you know what you need, you can go looking for a more permanent solution.
Computer Glasses
Don’t neglect your eyes. Blue light emitted from all the various electronic devices with a screen has been shown to cause eye fatigue, Macular Degeneration, and even blindness.
Fortunately this is where technology can actually help with the problem. If you spend copious amounts of time in front of the monitor or smartphone, use computer glasses that come with a bluelight filter to remove the harmful light from hitting your eyes.
Step 4: Pick the Right Keyboard and Mouse

Good Ergonomics- An Ergonomic Keyboard and Mouse Keeps the Hands and Arms in their Natural Positions while Working
It’s particularly important to get the placement and angle of your mouse and keyboard right, which in some cases may require you to ditch your current devices altogether for more ergonomic ones. Many office workers suffer from tendinitis, carpal tunnel syndrome and other repetitive strain injuries caused by poorly designed keyboards and mice or positioning.
Distance: Proper sitting posture dictates where you should place your keyboard. Your elbows should be comfortably at your side rather than behind or in front of you. Therefore, your keyboard should be in front of you at a distance you can comfortably reach with your elbows at your sides.
If your keyboard has a number pad, make sure you’re centering it based on the letters rather than the whole keyboard. The letter B should be in front of your navel.
Angle: The keyboard should have a slight negative angle of about 15 degrees. In other words, the keyboard should tilt away from you rather than towards you.
Unfortunately, most traditional keyboards are completely flat, with two little feet that tilt the keyboard towards you and causing you to type with flexed wrists; this leads to strained wrists and even carpal tunnel syndrome over time. Consider an ergonomic keyboard or keyboard tray to get that important negative tilt that keeps your hand and wrist in a neutral position when typing.
Height: Again, your posture and desk height dictates the correct height of your keyboard and mouse. Your forearms should be roughly parallel to the floor and your wrists straight rather than bent. If your desk is too high to allow this, you can use a keyboard tray or drawer to place your keyboard at the right height.
Look into an ergonomic keyboard if your fingers and wrist experience discomfort after a long day of typing. Ergonomic Keyboards are specially designed to allow your hands and wrists to assume their most natural positions when working on the keyboard- most of them tilt away from you, with the keys angled inwards to match the natural angle of your wrists at rest.
Computer mice come in different sizes and shapes. Look at an ergonomic mouse that’s contoured in the right places to eliminate the unconscious gripping and tension in your fingers that eventually leads to nerve pain and injury. For some people, a vertical mouse that mimics a handshake when you hold it is more ergonomic than a horizontal mouse, as there’s no need to twist your wrist when operating it.
What About Laptops?
More and more employers are replacing old desktops with laptops at work. Although laptops are sleek and portable, they also can make good ergonomic design more of a challenge. Getting your monitor at the right height can make the keyboard too high, while typing with the keyboard at the right height can force you to hunch over an excessively low monitor. Getting a good negative angle on the keyboard can be difficult, too.
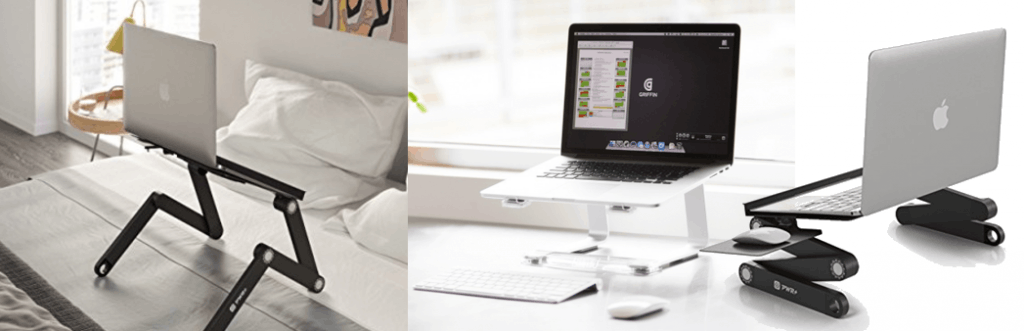
Good Ergonomics- A Laptop Stand is your Best Bet for Reducing Strains and Tension when Typing On a Laptop (48″ PWR+ Laptop Stand | Griffin Laptop Stand | Executive Laptop Stand)
There are plenty of ergonomic accessories that can help you out here. If your main concern is to improve the typing angle, a good bed tray or laptop stand is your best bet. You can also use a stand to elevate the laptop and attach an external keyboard in order to optimize the distance between the monitor and typing surface.
See our laptop ergonomics guide for more things laptop users should pay attention to.
Step 5 – Organize Your Workstation Into Zones
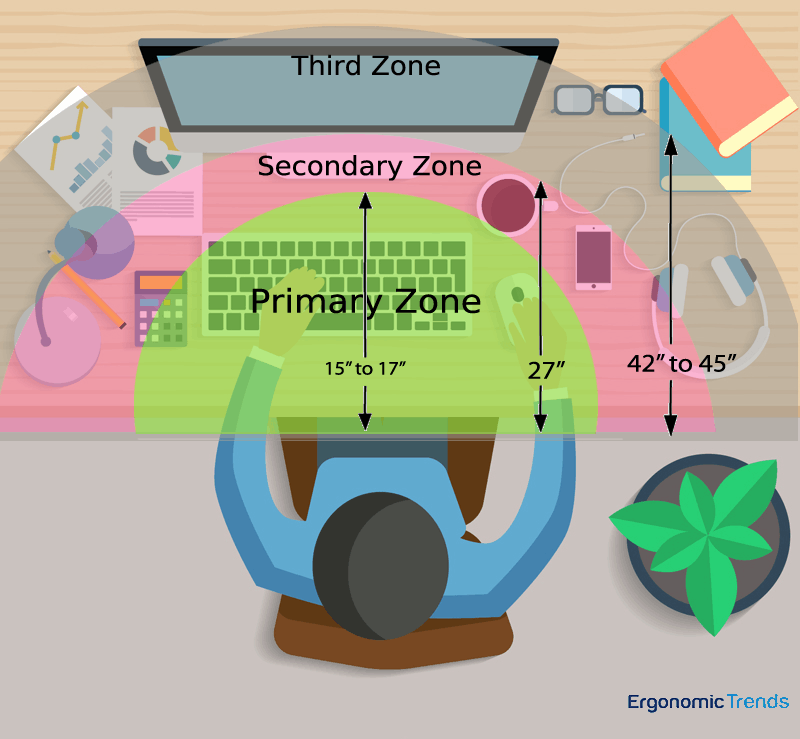
Good Ergonomics- Organize your Workspace into Reach Zones
When it comes to our workspace, we all have different styles, different needs and different tasks to do in the course of a typical work day. Whether you prefer a minimalist space or a bit more clutter, your desk is your dashboard. Things that you use all the time have to be comfortably within reach, and resources you use less often need to be easy to find. Experts recommend that you divide your desk into reach zones, arranging items according to how accessible they need to be during the course of your work day.
The first zone is where you can easily reach just by moving your forearms horizontally, with your elbows remaining comfortably near your sides. This area is normally dedicated to your keyboard and mouse. Nothing else should be in this zone unless you use it as much as your mouse and keyboard.
The next zone is reachable by extending your arms but without leaning or bending at the waist. This is a good area for things you use frequently such as reference books, notebooks or stationar you refer to often.
The third zone is reachable by extending the arms and bending or leaning at the waist. Although you can reach this zone without standing up, it’s not comfortable to do so frequently. This is a good area for things that you use just occasionally.
If your work area extends beyond this zone (for example, vertical shelving above your desk) it should be used for storage only.
Of course, most people prefer to have some personal items such as ornaments or family photos on their desk as well. Try to have enough of these to bring some warmth into your space, but not enough to distract you from your work. Some people say three items should be the limit, but all of us are different. Be aware of how you react to the things in your work area: are you using them as distractions or drawing on them as a source of creativity?
Arranging your workspace requires a little more soul-searching and self-awareness than finding the right keyboard tray. Our last step takes this self-appraisal even further.
Step 6 – Adjust Your Lifestyle
We sometimes think of our work day as something we have to get through – we can take proper care of ourselves when we get home and on our days off. But the reality is that we live a big part of our lives at work, whether in our home or an actual office, and it shouldn’t mean our health and happiness should be put on pause during this time. You don’t necessarily have to revamp your entire life, but take a look through the following suggestions. Chances are that you could make some improvements in at least one of these areas and see positive results.
Diet: Sadly, there is no miracle diet that will take away repetitive strain injury. However, healthy foods such as fruits, vegetables and fatty fish have been shown to reduce inflammation, while refined carbs and processed foods make it worse. Try skipping the chip truck and eating real food for lunch.

Exercise: It makes sense to approach the problem from both directions. Ergonomics adapts the environment to make your tasks easier on your body, while exercise adapts your body to make it more resilient to the effects of your work and environment. Both stretching and resistance exercise have been proven to help. Sneak a 30 minute walk into your daily lunch break for example. If you can, it’s a good idea to organize an exercise program for your employees or colleagues.

Work Environment: Take a look at your workspace and room lighting. Overly dim lighting makes it hard to focus, while harsh overhead fluorescent light can cause headaches. Natural light is best if you can get it. Also try to include some low maintenance plants in your office. Natural greenery has a restorative effect and keeps us focused. Learn about colour theory and make your office a more pleasant and productive space.

Mindfulness and Stress Reduction: When we’re stressed we disconnect from our feelings, not noticing building discomfort until it leads to serious pain or even injury. Finding ways to reduce your stress and increase your relaxation and mindfulness can keep you healthier at work.

The Perfect Workspace doesn’t have to be Perfect…
If you’ve been suffering with pain and discomfort as a result of your work, it’s good to know that you can do something about it. We all have to work within limitations – even if you have a home office, you may not be able to put in a window, for example – but within those limits there are plenty of simple and affordable options for making your work life less painful and more productive. Start today by making one positive adjustment, and slowly work your way towards creating your perfect ergonomic work space!